Practising avalanche rescue in 5 steps


By Martin Chester, FL backcountry editor
Welcome to one of my biggest soapboxes. We all carry a transceiver, shovel and probe, right? These are life-saving bits of kit, yet we arrogantly assume that a quick lap of an Arva park a few years ago will cut the mustard when the chips are down. Forget it! If you managed to find a transceiver buried in your mate’s glove (a foot under the surface) just the once, don’t kid yourself this makes you skilful.
You might as well leave the kit behind and save the weight, because I simply cannot think of any other skill we can acquire without good quality practice, and lots of it!
Practice makes permanent, not perfect – so we need to be getting it right, to be as realistic as possible, and to be doing it regularly if we have any chance of making it stick. So here are some tips to make your practice more effective:
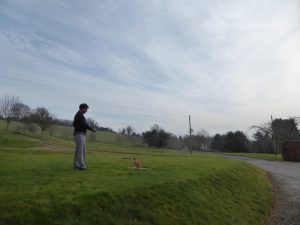
Your aim is not just to find the unit, but to understand how it works. Begin by pairing up and placing one transceiver in full vision (yes, really) just within range. Walk away until it gets faint, then put it down.
If you’re on snow, the ideal place for this is a concave bowl, so you can see the whole slope and see your tracks in the snow once you’re done. If not, no problem – a field or park will do.
Now meticulously follow the searching transceiver and see where it takes you. Any monkey can walk to the device – that’s not the point.
You need to learn that the angle of the transceiver makes a difference, and you may not travel in a straight line, so play around with the variables and see what happens to your tracks. If this is as far as you have ever got, shame on you! We have barely started…
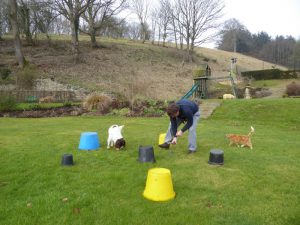
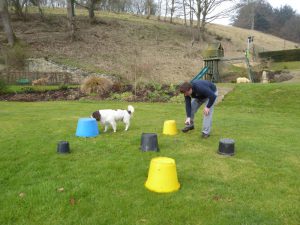
Set up a grid of overturned bowls (about 1m apart) then take it in turns to hide a transceiver and find which bowl it is under.Initially, don’t drop the transceiver below belt height.
Then bring it as high as your chest as a limit. With the hidden unit over a metre below you, this will prepare you for searching under the surface. Makes a great drinking game too, apparently.
Over a series of sessions you need to practise all three stages of transceiver search (find the signal in the first place, zoom in, then fine-pinpoint).
With clients I build this up every day – burying a transceiver in a rucksack, making sure
it is out of range (and at 45° to the team) to begin with, increasing the size of the search zone as folks get more proficient. Work up to further distance and greater depth of burial over time, and the team will need to start probing (then digging) to complete the task.
You need to be ready to find someone 1.5m under the surface, as this is the most common depth.
When you’re ready, head to the Arva park and search for several beacons. Most parks have the beacons in range from the off – so it is a step back in some ways.
Even better is to set up real exercises with your mates and bury a couple of packs with beacons inside. Make sure they are transmitting before you bury; start with two – quite a way apart (such as 10m); then build up the complexity with more devices and a range of close and scattered. This all leads to…
There is nothing like a mock incident to make you realise how complex it will be. Team up with another group in a hut and take it in turns to set up as real an incident as possible for each other.
It’s a great way to pass hut afternoons in the spring, and learn that the technical skills are the tip of the iceberg (albeit important foundations) when compared to the pressure and complexity of the real thing. Happy practising!
Here are some of our must reads from Fall-Line’s house experts.
How to: read and use the avalanche forecast for safer offpiste skiing